Canvas Add a Note to a File Uploaded in a Module
Add together and Organize Content in Your Canvas Course
At that place are many ways to go content and assessments into your new Canvas grade. This page focuses on how to add and organize content using the Canvas Modules page.
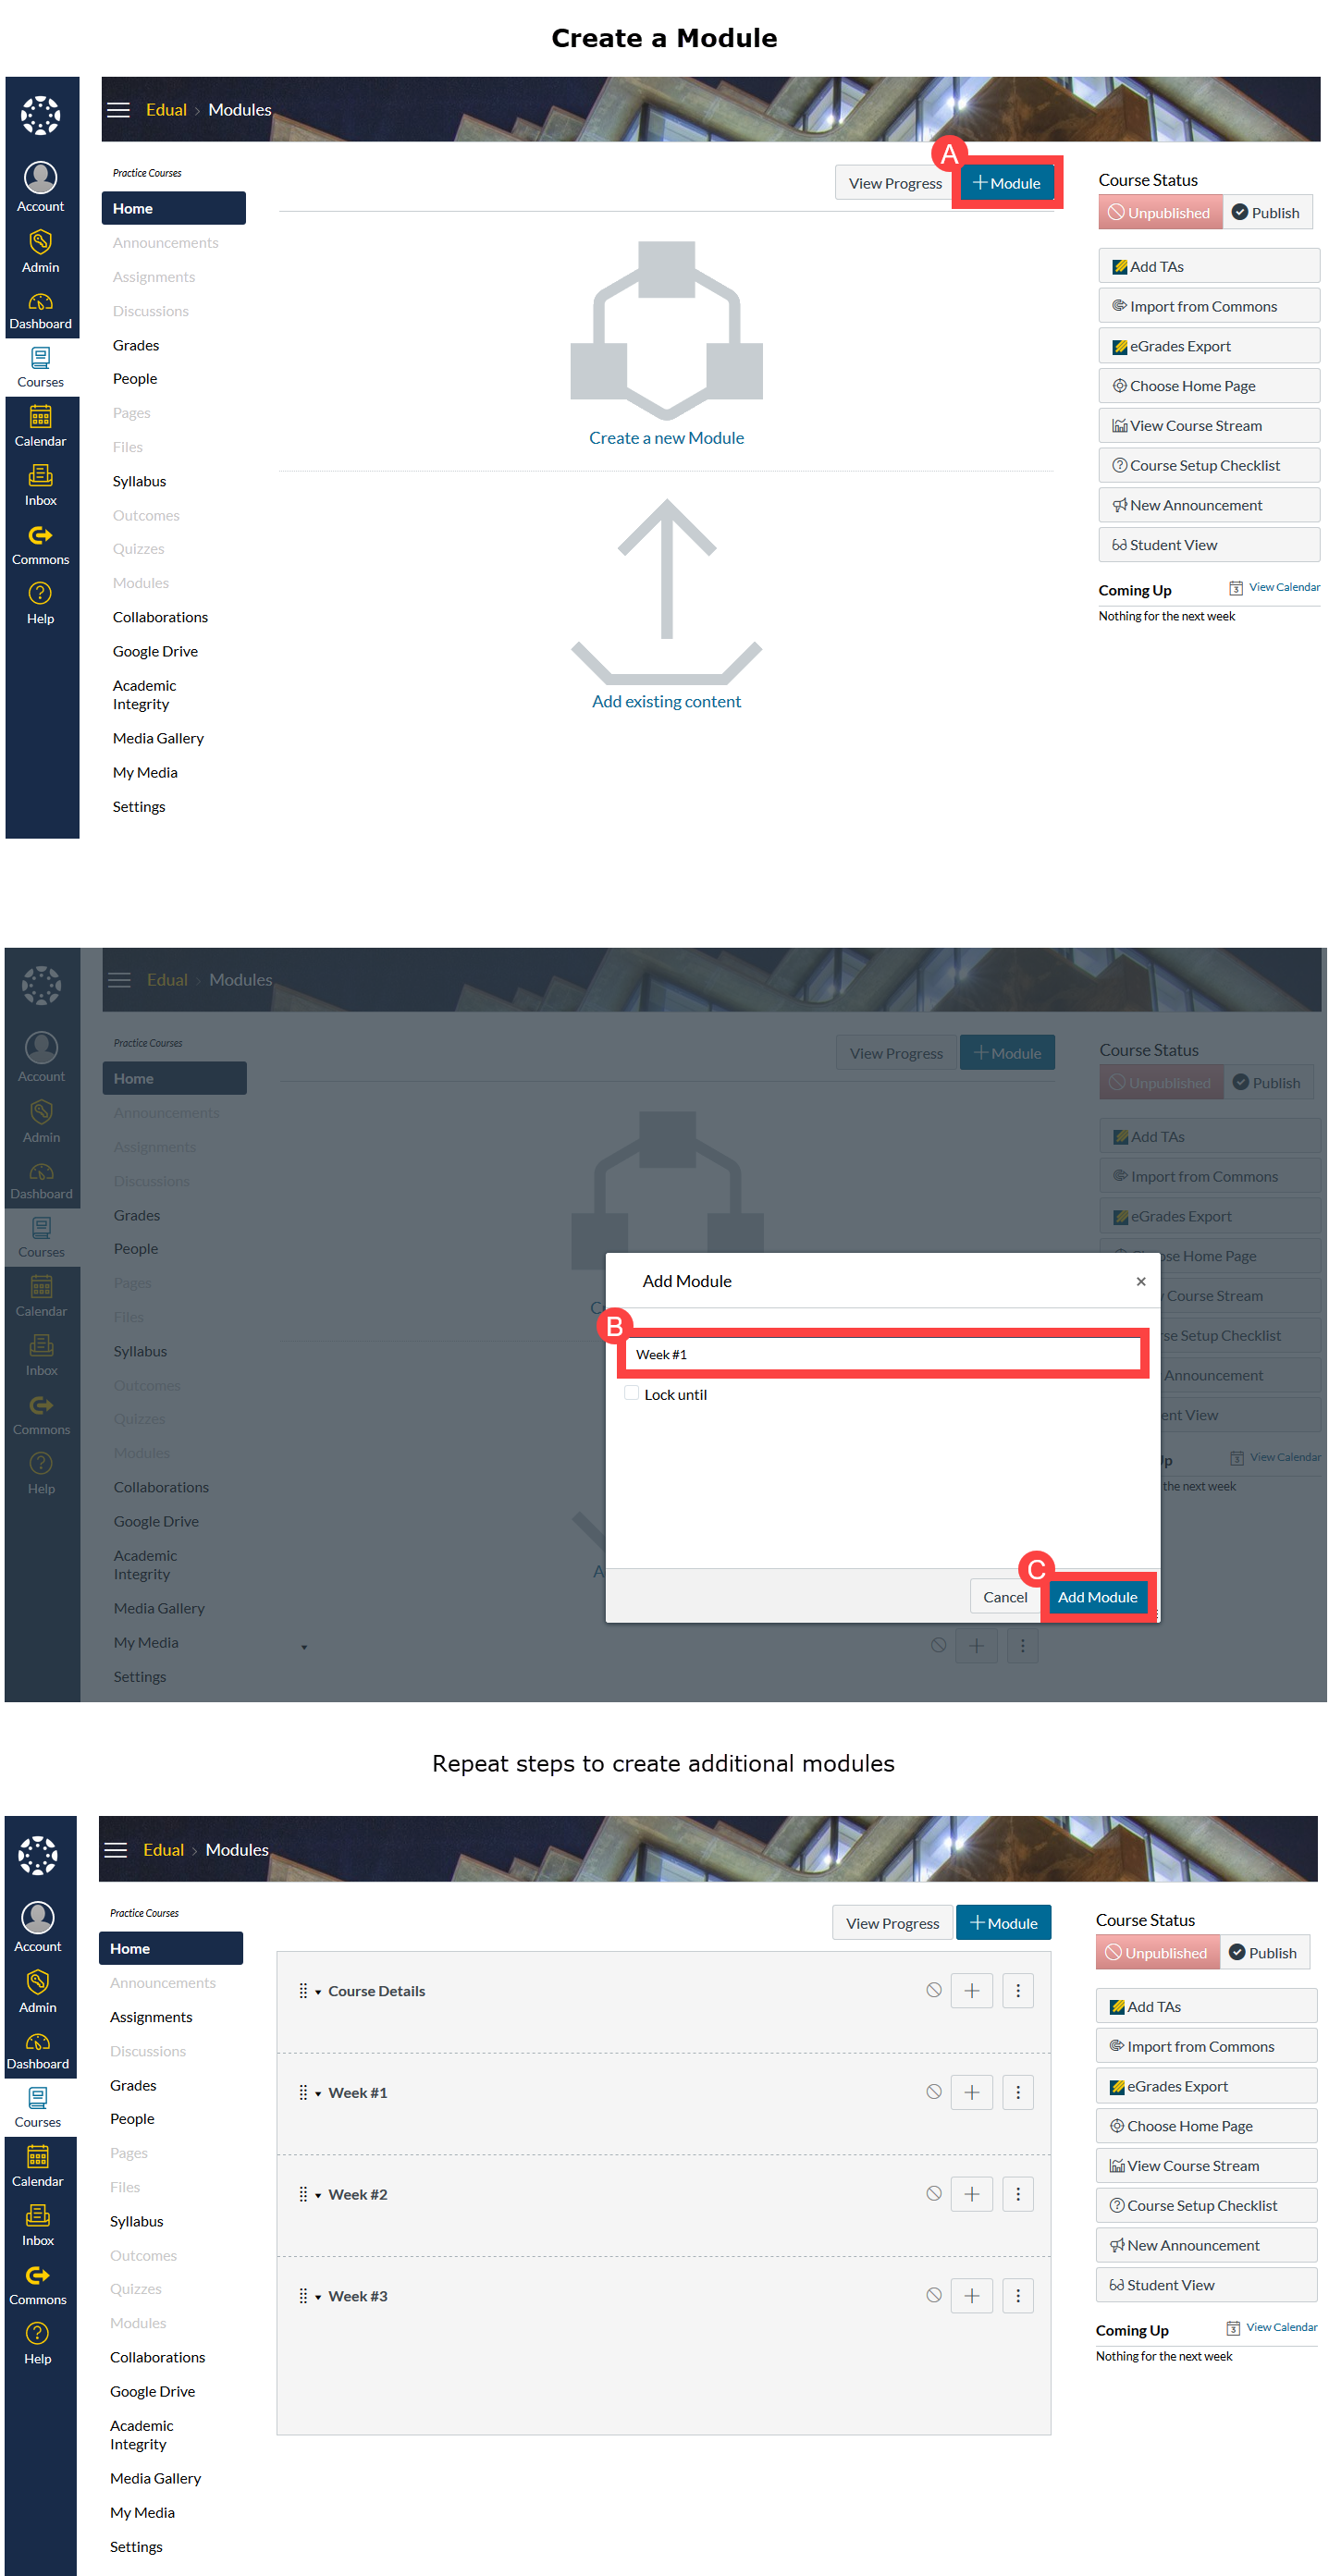
Create a module
Modules are substantially one-level folders that provide form construction by chunking content. Modules serve equally one-cease shops for content & assignments, since they can contain files, links, assessments, pages, and media.
Instructions
In your Canvas class, go to your Modules page (may also exist your grade homepage)
- Click the +Module
- Enter a championship for the new module
- Yous tin also choose to set a appointment release for the module
- Click the Add Module button
- Repeat steps to create additional modules
Detailed step-by-step instructions: Add a module (text-based instructions)
Visual Aid
Examples of modules
There are many means to organize modules. Some faculty members cull to organize their content in Modules based on specific topics or lodge of the class. Below are some examples of how someone might organize a course in Western Civilization.
Topics
Organizing content around topics can help students manage their reading. The ability to place all course content and activities, including assignments and discussions, within modules means that students see each topic every bit an integrated whole. While traditional files and folders are helpful for organizing documents and presentations, modules let faculty to place course activities in the aforementioned identify as class materials and files. In the example below, students admission course readings, activities, and assignments all in the same place, further helping to scaffold learning through the course.

Dates
Course dates can exist another helpful style to organize content in the course for students. In particular, the apply of dates helps students manage their readings, activities, and assignments calendar week-to-week. This organizational structure also has the benefit of reinforcing the form syllabus.
One disadvantage of placing dates in the modules names is that it makes the process of copying your form content from one semester to the side by side more challenging. Rather than assuasive Canvas to adjust dates for you (if all form dates are entered in the engagement field of assignments, discussions, and other course activities), placing course dates in modules will require y'all to change module names semester-to-semester.

Class Content
Organizing your modules by grade content is some other helpful mode to organize files in your grade. Students will take quick access to notes, lectures, readings, and other grade materials.

Notation that shorter module titles can help streamline your site and are optimal for accessing your Sail site on a mobile device.
Add a Syllabus / File
Files, similar PDFs, Word docs, video, and images can be added direct to a module.
Instructions
In your Canvas course, go to your Modules folio (may besides be your course homepage).
- Click the + button in the module where y'all want to place the new assignment.
- Click on the dropdown list
- Select the File choice.
- Click on the New File option.
- Click the Browse button and select the desired file
- The file proper noun volition also serve every bit the link name on the modules page.
- Click the Add Particular button.
- Back on the Module page, click on the file'southward publish condition icon to adjust the files availability to students.
- Select ane of the following options for pupil visibility:
- Publish - visible to students with no date restrictions
- Unpublish - not visible to students; visible to instructors and TAs
- Simply available to students with link - link will need to exist posted to a folio or e-mail
- Schedule student availability - visible to students earlier or after a engagement, or during a pre-defined engagement range.
- Click the Update button
- Hover over the visibility icon side by side to your file to confirm the visibility setting is correct.
Detailed step-by-step instructions: How do I upload a file to a course? and/or How practice I restrict files in Canvas? (text-based instructions)
Visual Aid

The Rich Content Editor
The Rich Content Editor (RCE) in Sail makes text editing and media placement possible in:
- Pages
- Assignments
- Discussions
- Quizzes
- Announcements

Functionality
The RCE includes the tools you would detect in most electronic mail and word processing software. This makes information technology possible to:
- Enter and format text
- Insert external and internal (ie, course content) hyperlinks
- Add tables
- Insert equations
- Embed multimedia content
- Videos
- Images
- Audio files
RCE Toolbar
The toolbar options include the ability to utilise:
- Bold
- Italics
- Underline
- Text color picker
- Groundwork color picker: This will but change the background of lines of text.
- Alignment options: left, middle, and correct aligned text.
- Indent and de-indent
- Super- and sub-script
- Bulleted lists and numbered lists
- Insert/Edit media: Not recommended. See below for suggested media options)
- Link to URL and Remove link:
- The left concatenation icon will create a link
- The right concatenation icon removes a link
- You tin can as well utilise the chain icon (left) to provide an in-browser preview of any files, similar Give-and-take and PDF, you lot include in your content.
- Canvas and third-political party tools (plug icon): Embed files, videos, and audio files using:
- YouTube: This choice skips ads that are typically shown at the start of videos. Suggested videos part at the end of YouTube videos is also disabled.
- Google Drive: Link to or embed files from your Google account.
- Kaltura (under More external tools): Video hosting server where you lot can upload your videos, including lecture capture/podcasting videos. Kaltura likewise makes it possible to embed questions within the video using their Video Quiz tool.
- Native Sail multimedia tool: Tape or upload video and/or audio. Uploads are limited to 500MB per file.
- Left-to-right text catamenia (default) or correct-to-left text menses.
- Font size: Arrange text size. For titles and header use the following option, font style, to better adapt people who are blind or visually impaired.
- Font style: Select from built-in paragraph and header fonts. Selecting this rather than just changing the font size makes these headers stand out when screen readers verbalize the content, thereby increasing the accessibility of your content.
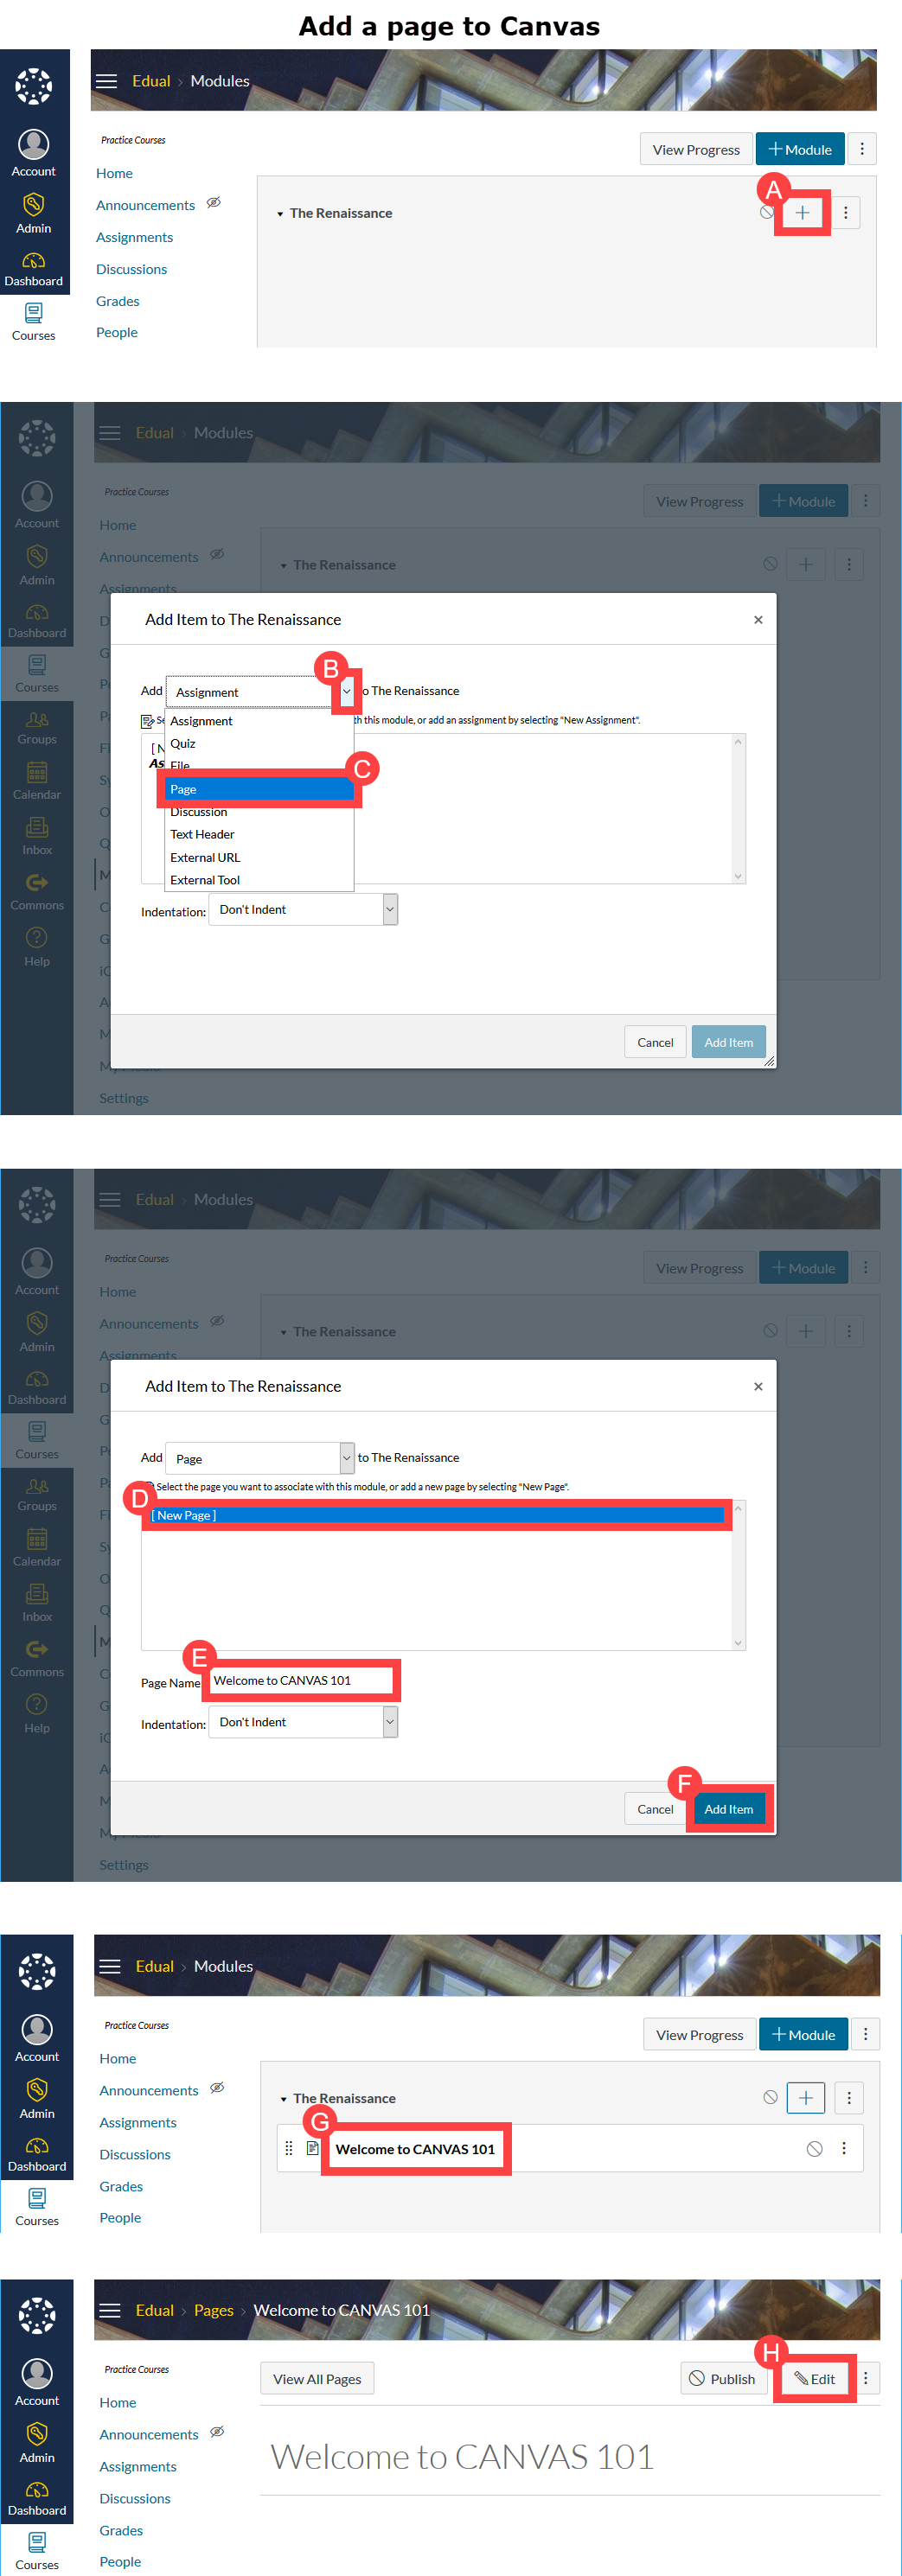
Create a course page
The Pages tool enables you to create custom web pages within your Canvass class. Pages tin be used equally a static data folio or as a wiki tool. A page can include text, video, and links. You lot can use pages to for your instructor bio, course policies, reading lists, lessons, and/or list of resource.
Instructions
In your Canvas form, get to your Modules folio (may also exist your course homepage)
- Click the + button in the module where yous want to identify the new page.
- Click on the dropdown list on the next window.
- Click on the Page choice.
- Click on the New Page option.
- Give the page a name
- The name will also serve equally the header of the page
- Click the Add Item button.
- Click on the page'southward title dorsum on the Module page.
- Click the Edit push.
- Use the Rich Content Editor to add content to the page.
Detailed step-past-footstep instructions: Create a New Page in a Course (text-based instructions)
Visual Aid
Create an online consignment
You tin can choose to have students submit files, media recordings, website URLs, or text entries using the Sail Online Assignment tool.
Instructions
In your Canvas course, go to your Modules folio (may also be your class homepage).
- Click the + push button in the module where you desire to place the new assignment.
- Click on the dropdown listing on the next window and select the Assignment option.
- Click on the New Assignment option.
- Give the assignment a name
- The name will likewise serve equally the header of the assignment details page.
- Click the Add Particular button.
- Click on the assignment's championship dorsum on the Module folio.
- Click the Edit button.
- Enter assignment details, such equally:
- A clarification
- Assignment's value in points
- Click on the Submission Type dropdown carte.
- Select the Online option
- Select the type of online submission
- Selecting more than than 1 option is possible, but students tin only select one option per submission
- The File Upload option is ideal for annotating and providing in-document feedback
- We recommend restricting the type of files you are accepting if using the File Upload pick. Separate the file type extensions with commas (eg, physician, docx, pdf)
- Enter assignees and due date
- Multiple due dates can exist added using the +Add option - useful for assigning to unlike sections, or for students who demand an extension.
- The Available from and Until options control who early on and late students can submit an assignment.
- When done with entering the details, click either:
- Save - if y'all're not ready to make visible to students, or
- Save & Publish - if y'all're fix to make the assignment available to students.
Detailed step-by-footstep instructions: How do I create an online assignment? and/or How practice I add together or edit assignment details? (text-based instructions)
Visual Aid

Create a Turnitin assignment
Instructors tin can generate a Turnitin Plagiarism similarity written report when setting up an online submission assignment. The setup described below are for assignments that will exist stored and graded within Sheet. You can notwithstanding utilize the Turnitin Feedback Studio to review the sources of similarly-matched passages. To use the "traditional" version of Turnitin, please refer to Turnitin's Creating a Canvas LTI assignment article.
If you are using Turnitin for your course, information technology is recommended that y'all place the following language from UC San Diego'southward Academic Integrity Office in your syllabus:
"Students concord that past taking this form all required papers will be subject to submission for textual similarity review to Turnitin.com for the detection of plagiarism. All submitted papers will be included as source documents in the Turnitin.com reference database solely for the purpose of detecting plagiarism of such papers. Use of the Turnitin.com service is subject to the terms of employ agreement posted on the Turnitin.com site."
Instructions
In your Canvass course, get to your Modules page (may also be your course homepage).
- Click the + button in the module where you desire to identify the new assignment.
- Click on the dropdown list on the next window and select the Assignment pick.
- Click on the New Assignment option.
- Requite the assignment a name
- The proper noun will also serve equally the header of the consignment details folio.
- Click the Add Item button.
- Click on the assignment's title back on the Module page.
- Click the Edit button.
- Enter assignment details, such as:
- A description
- Assignment'south value in points
- Click on the Submission Blazon dropdown menu.
- Select the Online option
- Activate the File Uploads checkbox
- Y'all can choose to restrict the filetypes to doc, docx, and/or pdf
- Click on the dropdown carte du jour in the Plagiarism Review section
- Select the Turnitin option
- Set your Turnitin options
- Enter assignees and due date
- Multiple due dates can be added using the +Add option - useful for assigning to different sections, or for students who need an extension.
- The Available from and Until options control who early on and belatedly students can submit an assignment.
- When done with entering the details, click either:
- Save - if y'all're not set up to make visible to students, or
- Save & Publish - if you're set up to make the assignment available to students.
Detailed step-by-stride instructions: Creating a [Turnitin] assignment (text-based instructions).
Visual Help

Create a Gradebook Column / In-class Consignment
In order to create a cavalcade in the gradebook, you volition have to create a graded assignment, graded quiz, or graded give-and-take. To create a grade column for attendance, participation, in-class exams, or on-newspaper essays, follow the instructions beneath.
Instructions
In your Canvas form, get to your Modules page (may also be your course homepage).
- Click the + push in the module where y'all want to place the new assignment.
- Click on the dropdown list on the next window and select the Assignment choice.
- Click on the New Assignment option.
- Give the consignment a proper noun
- The proper name will also serve as the header of the assignment details folio.
- Click the Add Item button.
- Click on the assignment's title back on the Module page.
- Click the Edit push.
- Enter assignment details, such as:
- A description
- Consignment's value in points
- Click on the Submission Type dropdown card, and select:
- No Submission - for attendance, participation, and other intangibles students are being graded on, or
- On Newspaper - for in-class exams or activities, and paper-based essays/reports.
- Enter assignees and due date
- Multiple due dates can be added using the +Add together pick - useful for assigning to different sections, or for students who need an extension.
- The Bachelor from and Until options control who early and late students can submit an assignment.
- When done with inbound the details, click either:
- Salvage - if you're non set up to brand visible to students, or
- Salvage & Publish - if you're ready to make the assignment available to students.
Detailed stride-past-step instructions: How do I add together or edit consignment details? (text-based instructions)
Visual Aid

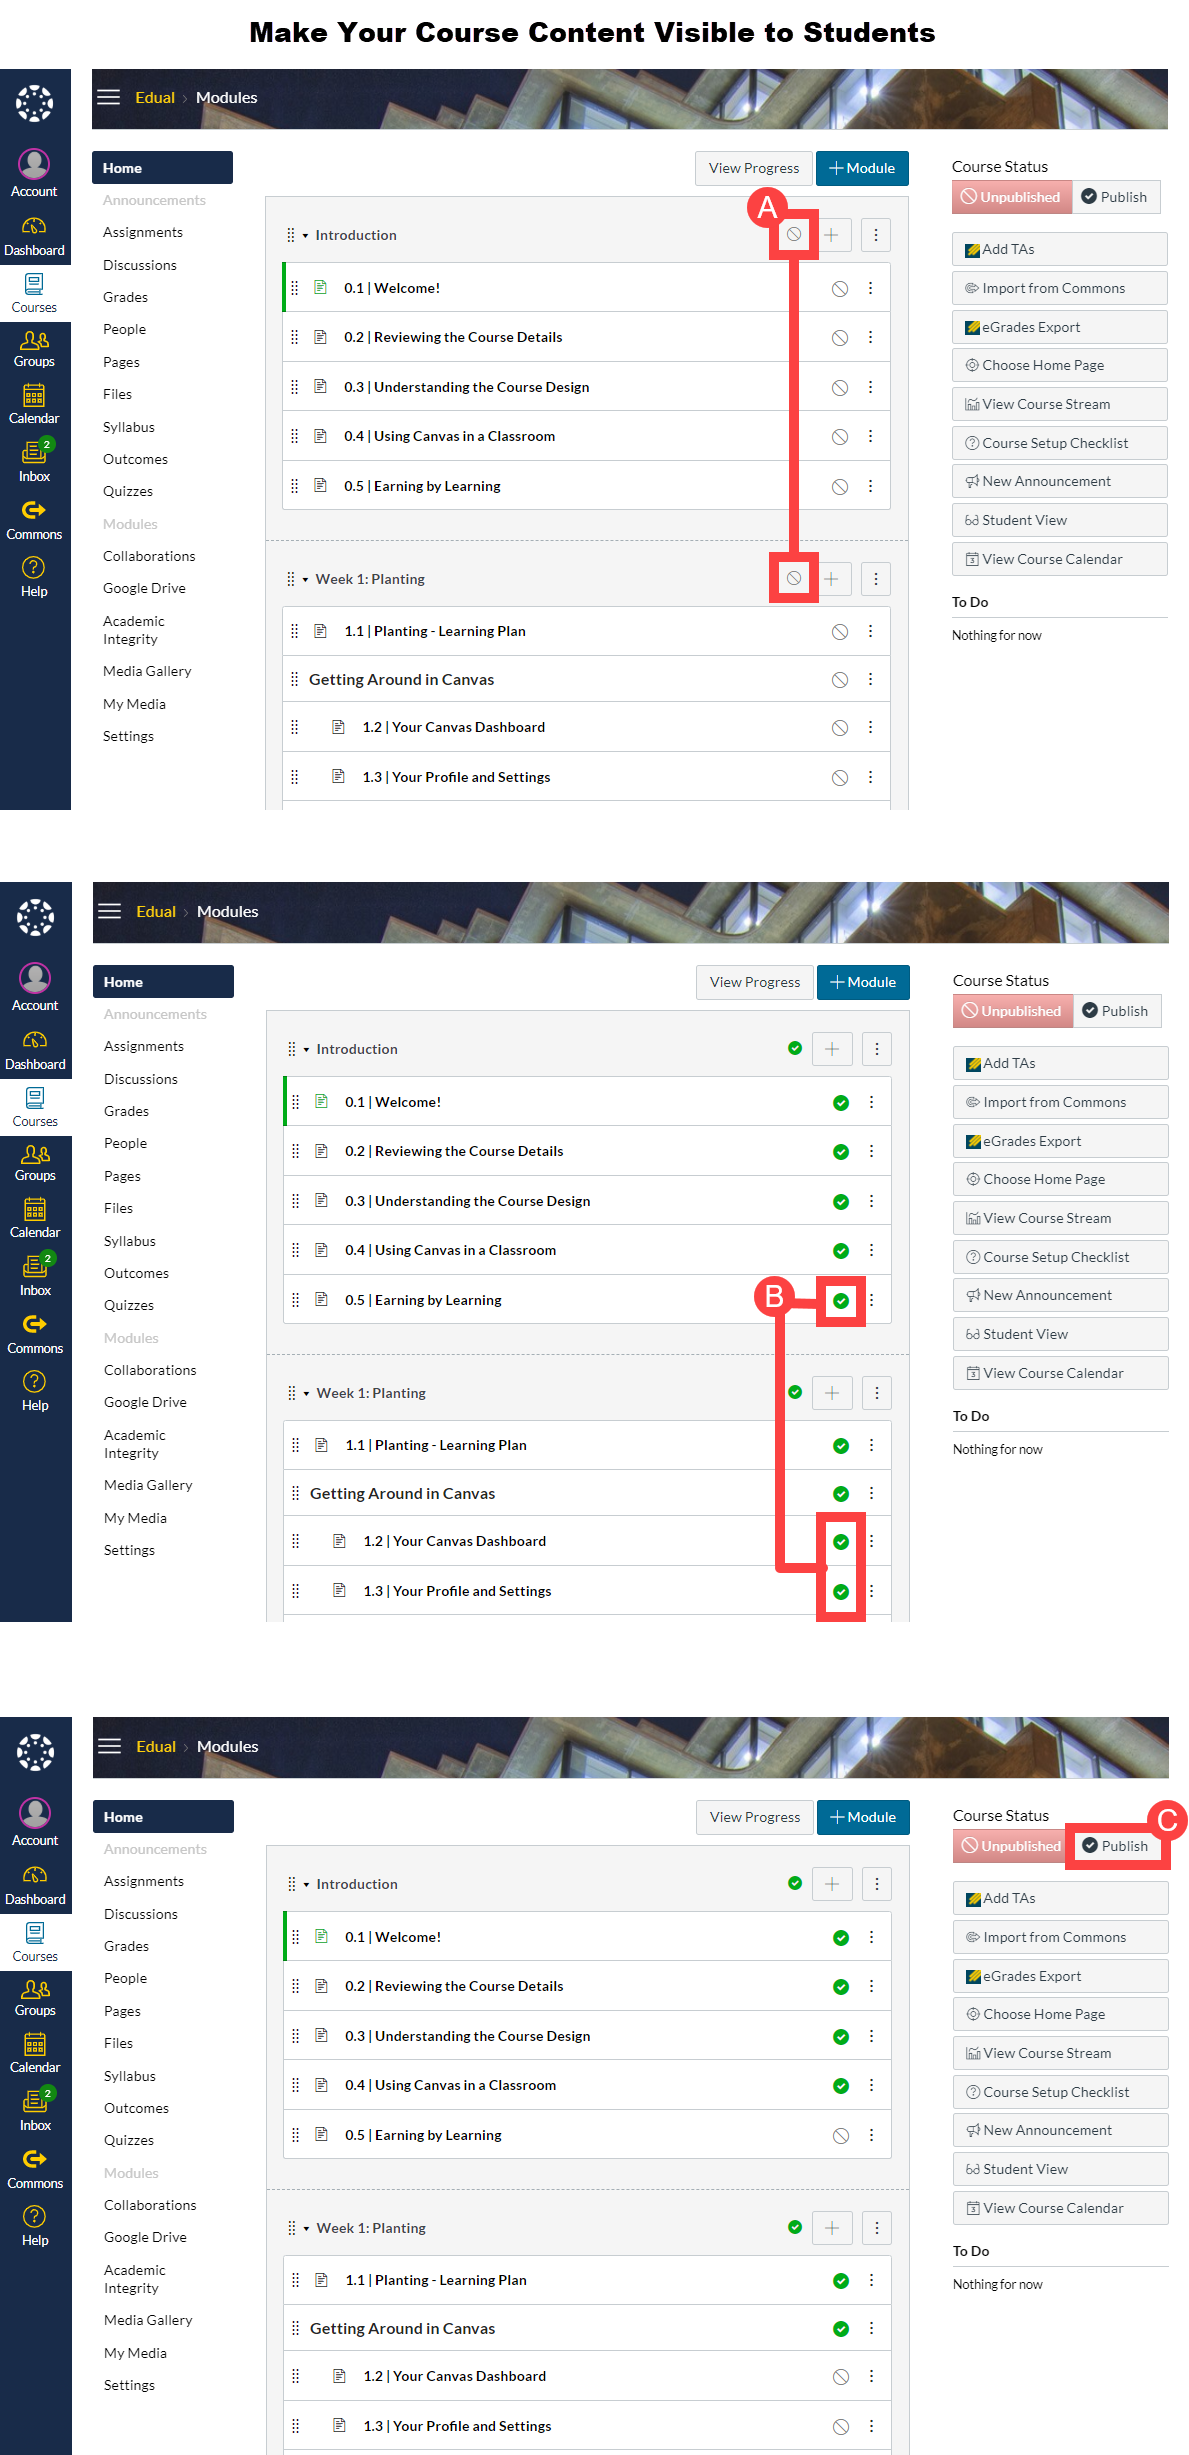
Publish! Publish! Publish!
Students won't exist able to access files, assignments, pages, modules, etc., unless you publish those items. So don't forget to publish all your content items (eg, files and assignments). Publish your modules. And, final merely non to the lowest degree, publish your course.
Instructions
- On the Modules page, click on the slashed circumvolve icon to the right of each module title.
- Slashed circles should convert to green circles with a white checkmark, indicating that the module AND all its items are visible to students.
- Unpublish any detail by clicking on the item's green circle icon.
- Become to the "Course Status" department in the homepage's sidebar and click thePublish push button.
- The course will exist queued for visibility starting on the official start day of instruction, unless you customized your start and finish dates.
Detailed footstep-by-stride instructions: Publish a Course (text-based instructions)
Visual Aid
Source: https://edtech.ucsd.edu/resources/checklists/add-content.html
0 Response to "Canvas Add a Note to a File Uploaded in a Module"
ارسال یک نظر